
While today’s power supplies provide many advanced features, finding them and maximizing their capabilities can be challenging. That’s why when AMETEK Programmable Power designed the Sorensen™ SGX Series programmable DC power supplies, we paid a lot of attention to the user interface. The result? The SGX Series has an intuitive, easy-to-use front panel touchscreen display that allows you to quickly access output programming parameters, measurements, sequencing, and configuration and system settings.
Home screen menu
Figure 1 shows the SGX Series Home screen. It features a simple menu that allows you to select the following functions:
- Dashboard: Set up and measure output parameters, including Voltage, Current, and Power (applicable only in Constant-Power (CP) mode). The Dashboard also allows you to set the Regulation mode, Overvoltage Protection (OVP), and user Voltage and Current (V/I) Limits.
- Output Program: Set output Voltage, Current, Power (applicable only in CP mode), and OVP.
- Measurements: Display output measurements, including Voltage, Current, and Power.
- Ramp: Program voltage and current ramps.
- Sequencing: Set up the supply to automatically run a series of Voltage, Current, and Power mode operations.
- Configuration: Set up Power-ON States (PONS), User V/I Limits, Total System Current, Profiles, Regulation Mode, and Measurement Settings.
- Control Interface: Set up RS-232, GPIB, and LAN remote digital interfaces.
- System Settings: Set up system parameters, such as Language, Display Brightness, Default Screen Timeout, and Hardware Parameter Limits. You can also display System Information (e.g., firmware version).
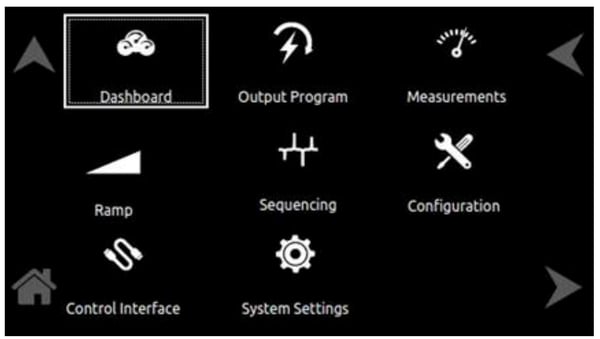 Figure 1: SGX Series Home screen
Each menu on the Home screen can be reached in one of two ways:
- Tap the selected menu on the front panel touchscreen.
- Scroll to the menu with the encoder and depress the encoder switch.
Tapping the Up Arrow button will take you back to the previous screen. Tapping the Home button will take you back to the Home screen.
Dashboard functionality
To illustrate the functionality of the front panel touchscreen display, let’s take a look at what you can do with the Dashboard. Figure 2 shows an example of the information available on the Dashboard screen when the supply is in the Constant-Current/Constant-Voltage (CC/CV) mode.
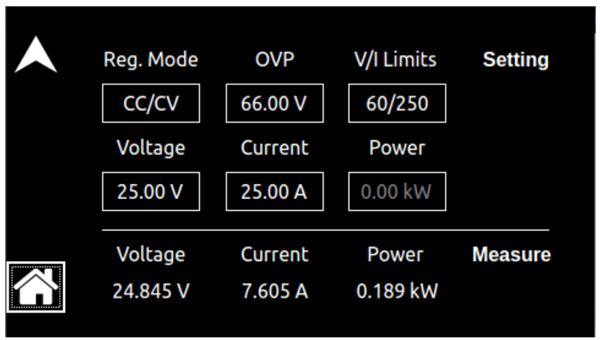
Figure 2: SGX Series Dashboard screen
On this screen, you can change and simultaneously view the most commonly used output parameters. The settings include Voltage, Current, and Power as well as Reg. (Regulation) Mode, OVP, and V/I Limits. To adjust a setting, simply select one of the parameters by touching the screen or selecting it with the rotary encoder. Then, you can rotate the encoder to adjust the value up or down. In addition to the settings, this screen also displays the output Voltage, Current, and Power measurements.
Additional information
For more information on the SGX Series or any of AMETEK’s programmable power supplies and programmable loads, contact an authorized AMETEK Programmable Power sales representative by visiting https://www.powerandtest.com/about-us/contact. You can also contact us toll-free at 800-733-5427 or 858-450-0085 or at sales.ppd@ametek.com.